This is a tutorial on how to edit uploaded pictures on the fly using URL parameters!
English follows Hebrew!
עריכת תמונות בפשוטת ובמהירות
בפוסט הזה אתן לכם טיפ ענק שיחסוך לכם זמן וגם ישפר את איכות הפוסט שלכם פלאים במידה ואתם מעלים תמונות לפוסט שלכם (מה שבכלל מאוד מומלץ כדי למשוך קוראים). ואראה איך ניתן לערוך תמונות כדי לקבל תוצאה מקצועית ומגניבה במהירות
לפני:
https://cdn.pixabay.com/photo/2018/01/04/06/44/snow-3059974_960_720.jpg
קרדיט לתמונה: Pixabay
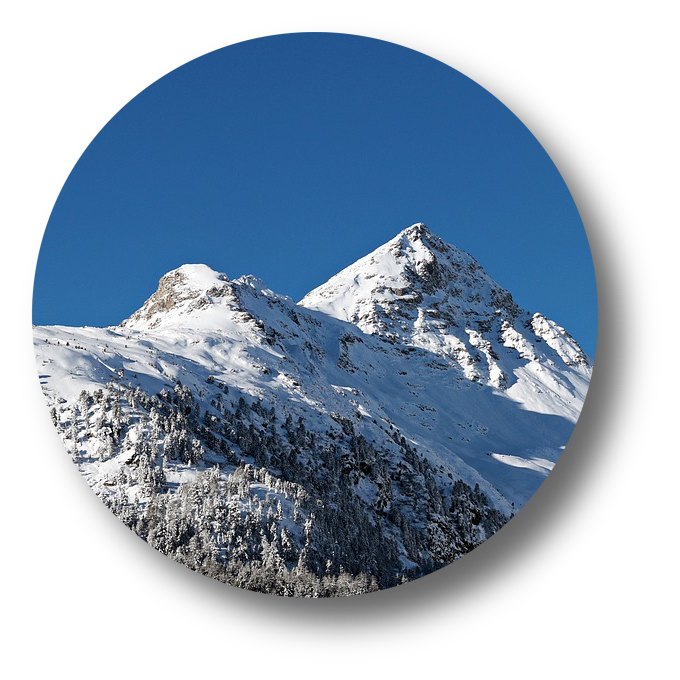
אחרי:
[IMAGE: https://steemitimages.com/DQmYimTdKyQh2EwL5LuuzFoWu41sf7PTfm9WPLn1KbHR2Rt/image.png]
השירות שנשתמש בו
השירות נקרא Filestack והוא נותן לנו אופציה לערוך 500 תמונות בחודש בחינם לגמרי! ההרשמה אליו פשוטה וניתן להשלים אותה תוך התחברות לפייסבוק או גוגל, לעצלנים מבניכם.
לאחר שנרשמתם, הכנסו אל הDashboard ותראו טבלה, בה יש API Key שמרו אותו, אנחנו עוד נצטרך אותו.
איך משתמשים?
בגדול השימוש הוא נורא פשוט. לפני כתובת התמונה שלנו, נוסיף
https://process.filestackapi.com///
נראה דוגמאות שימוש מלאות ממש עוד רגע, כשנלמד על הפרמטרים שהתמונה יכולה לקבל.
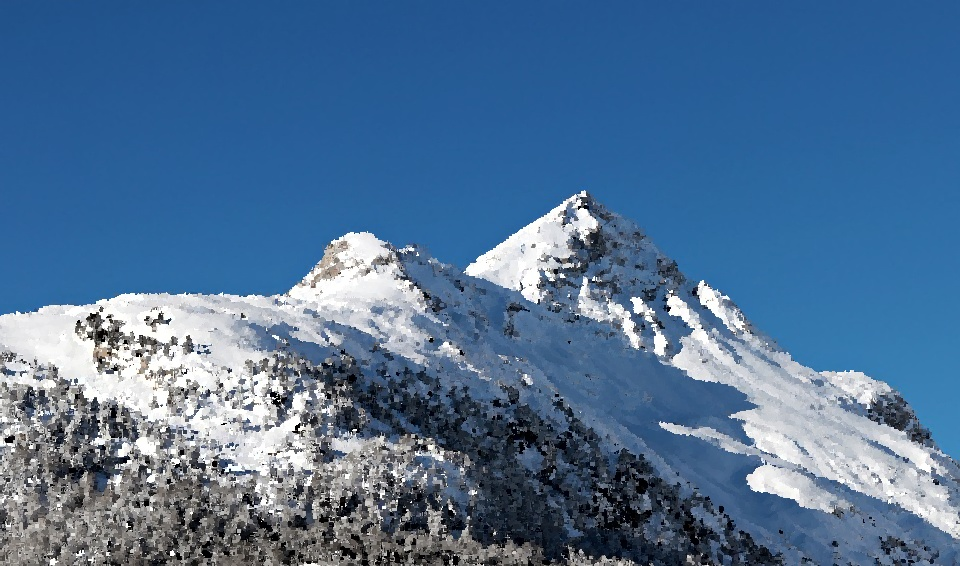
שינויי גודל
ניתן לשנות את הגודל באמצעות הפרמטר resize.
נראה את האופציות ששינוי הגודל מאפשר. לצורך ההדגמה כתובת התמונה שנשתמש בה תהיה:
https://cdn.pixabay.com/photo/2018/01/04/06/44/snow-3059974_960_720.jpg
כעת נשתמש ב״נוסחת״ הכתובת שהבאתי ממש קודם לכן ונציב הכל במקומות המתאימים. נכנס את הAPI Key למקומו, נרשום את הפרמטר resize וכתובת התמונה.
https://process.filestackapi.com/myFaKeApIKeY123/resize=h:100,w:200/https://cdn.pixabay.com/photo/2018/01/04/06/44/snow-3059974_960_720.jpg
[IMAGE: https://steemitimages.com/DQmUMBQ9vzFgkbc8hbNjGYhQfgZ7GTfjydnrfG31i4Kcx5B/image.png]
ישור תמונה
יכולת נוספת של פרמטר resize היא ליישר את התמונה, לימין, לשמאל או אפילו לפי פרצופים!
האופציה תכתב כך:
fit:crop,resize=align:faces
סוגי היישור האפשריים הם center, right, left או faces
נראה דוגמה עבור התמונה הבאה:
https://cdn.pixabay.com/photo/2018/01/04/14/16/woman-3060784_960_720.jpg
קרדיט: Pixabay
https://process.filestackapi.com/myFaKeApIKeY123/resize=w:100,h:500,fit:crop,align:faces/https://cdn.pixabay.com/photo/2018/01/04/14/16/woman-3060784_960_720.jpg
[IMAGE: https://steemitimages.com/DQmeXiB78PyjibzREJqV4Ui6CY4fqga3nawS4Ba1MKDTANz/image.png]
מסגרות
ישנן כמה סוגי מסגרות שניתן לתת כפרמטרים.
circle- מחזירה מסגרת מעוגלתtorn_edges- שוליים קרועים, כמו תמונה מהעברshadow- מחזירה תמונה עם צל על הרקע הגורם להבלטהpolaroid- רקע המדמה תמונה שצולמה במצלמת פולארוידvignette- טשטוש הקצוות
דוגמאות:
https://process.filestackapi.com/MyFakeApiKey/polaroid/https://cdn.pixabay.com/photo/2018/01/04/14/16/woman-3060784_960_720.jpg
[IMAGE: https://steemitimages.com/DQmX3pLJs4BrzBfowovn3XhrdmH2RgmUQG8rxhxAZdiaHtr/image.png]
https://process.filestackapi.com/MyFakeApiKey/circle/shadow/https://cdn.pixabay.com/photo/2018/01/04/06/44/snow-3059974_960_720.jpg
https://steemitimages.com/DQmYimTdKyQh2EwL5LuuzFoWu41sf7PTfm9WPLn1KbHR2Rt/image.png
אתן לכם לגלות את השאר בעצמכם!
פילטרים
הפילטרים האפשריים הם:
monochromesepiasharpenbluroilpaintblackwhite
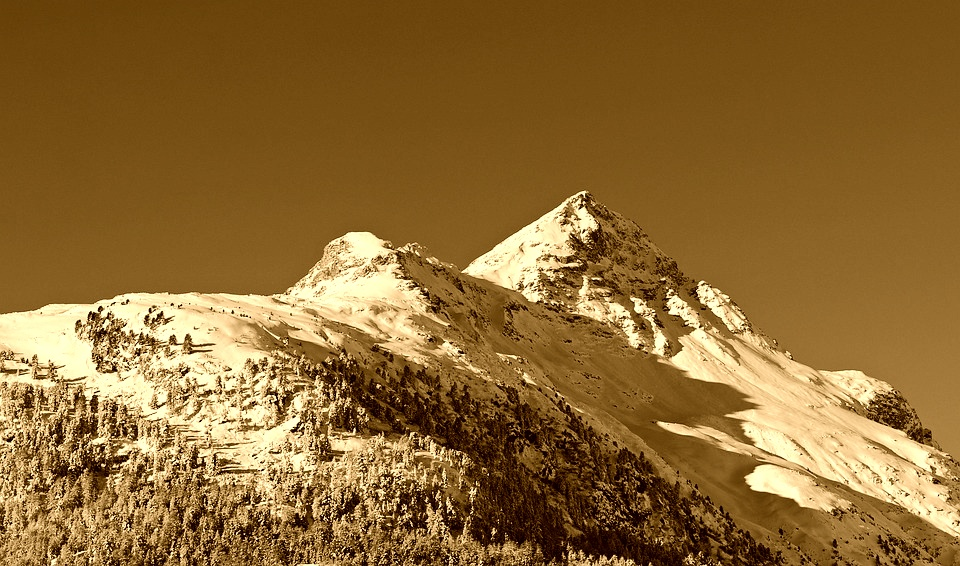
דוגמאות!
https://process.filestackapi.com/MyFakeApiKey/sepia/https://cdn.pixabay.com/photo/2018/01/04/06/44/snow-3059974_960_720.jpg
[IMAGE: https://steemitimages.com/DQmZUaYVR1HunpGVKE1WUSSUqgAS5qyFL11V2FCspCx4fPL/image.png]
https://process.filestackapi.com/MyFakeApiKey/oil_paint/https://cdn.pixabay.com/photo/2018/01/04/06/44/snow-3059974_960_720.jpg
[IMAGE: https://steemitimages.com/DQmbcetLjH18VcghXviLzbpqUgBasbLw76X3fRcXcTvwSqG/image.png]
צילום מסך לאתר
עצלנים? אין בעיה. ככה תעשו את זה
https://process.filestackapi.com/MyFakeApiKey/urlscreenshot/resize=h:500,w:1000,fit:crop,a:top/http://www.busy.org
[IMAGE: https://steemitimages.com/DQmThqEW7GcwTz8Tem3GKdMpKcepYmqBPx9CApBHcewMCzz/image.png]
תמונה לטקסט
עוד יכולת מגניבה היא המרת תמונה לטקסט!
בואו נראה.
https://process.filestackapi.com/MyFakeApiKey//ascii/https://s11.postimg.org/6fr8dafcj/steem.jpg
                                                        ..
                                                      .:;,
                                                    ,:;;;.
                                                  ,;;;;;;.
                                 .              .:;;;;;;:                        .
                              .:11.            ,;;;;;;;;:                     .;1i
                            .;1tfi            :;;;;;;;;;:                   .ittf:
                           :1fttt;           :;;;;;;;;;;;                 .;ttttt,
                         .ifttttt:          ,;;;;;;;;;;;;.               ,ttttttt.
                        ,tttttttf;          ,;;;;;;;;;;;;;              :tttttttt,
                       .1tttttttti          .;;;;;;;;;;;;;:            ,ttttttttf:
                       ,tttttttttt,          :;;;;;;;;;;;;;:           ;ttttttttt1.
                       .ttttttttttt.         .;;;;;;;;;;;;;;,          :tttttttttti
                        ;fttttttttt1.         :;;;;;;;;;;;;;;,          1tttttttttf;
                         1tttttttttt1.         :;;;;;;;;;;;;;;,         ,ttttttttttt;
                         ,ttttttttttt1         .;;;;;;;;;;;;;;;,         ;ttttttttttt;
                          :ttttttttttt1         .;;;;;;;;;;;;;;;,         ittttttttttt;
                           ;ftttttttttti         ,;;;;;;;;;;;;;;;,         1ttttttttttt:
                            ;ftttttttttti         ,;;;;;;;;;;;;;;;,        .1ttttttttttt:
                             iftttttttttti         ,;;;;;;;;;;;;;;;,        .1ttttttttttt:
                              ittttttttttf;         ,;;;;;;;;;;;;;;;.        .tttttttttttt,
                               iftttttttttf;         ,;;;;;;;;;;;;;;;.        .tttttttttttt,
                                iftttttttttt:         ,;;;;;;;;;;;;;;;.        .ttttttttttt1.
                                 ittttttttttt.         ,;;;;;;;;;;;;;;:         ,ttttttttttti
                                  1tttttttttt1          :;;;;;;;;;;;;;;:         ,ttttttttttf:
                                  .1tttttttttt:          :;;;;;;;;;;;;;;.         ,ttttttttttt.
                                   .tttttttttti           :;;;;;;;;;;;;;;          :tttttttttt:
                                    :ttttttttf;            :;;;;;;;;;;;;;,          1ttttttttt,
                                    .tttttttfi             .;;;;;;;;;;;;;:          :fttttttt:
                                    .ttttttt:               ,;;;;;;;;;;;;:          :fttttf1,
                                    :ftttti.                 ;;;;;;;;;;;:           ittttt;
                                    1ttt1:                   :;;;;;;;;;:           ,tttti.
                                   :ft1:                     ;;;;;;;;;,            1fti,
                                  .1i:                      .;;;;;;;:.            :t;,
                                   .                        :;;;;;;,              ..
                                                           .;;;;;,
                                                           :;;;,
                                                          .;:,
                                                           .
מקווה שלמדתם ונהנתם מהמדריך.
English
In this post, you'll learn how to kick-ass by editing pictures by only changing their URLs, on the fly! I promise this will be fast and easy and a nice thing to pump up your posts. Let's see a before and after photos:
Before:
https://cdn.pixabay.com/photo/2018/01/04/06/44/snow-3059974_960_720.jpg
קרדיט לתמונה: Pixabay
After:
[IMAGE: https://steemitimages.com/DQmYimTdKyQh2EwL5LuuzFoWu41sf7PTfm9WPLn1KbHR2Rt/image.png]
The platform that we'll be using
So we'll be using Filestack to do our on-the-fly editing. They offer 500 FREE image transformations just by signing up. You can sign up using Google or Slack if you're too lazy. Once you're in, go to the Dashboard and keep your API key. We'll be using it soon enough.
How to use Filestack's service?
It's easy! You'll just have to use this type of URL:
https://process.filestackapi.com///
I'll demonstrate some practical examples when I cover some parameters so it'll be clearer.
Resizes
The most trivial transformation you'll do for a picture would be to change it's dimension. It's done via the resize parameter which takes options such as height and width.
Let's see a live example:
https://process.filestackapi.com/myFaKeApIKeY123/resize=h:100,w:200/https://cdn.pixabay.com/photo/2018/01/04/06/44/snow-3059974_960_720.jpg
the h:100,w:200 stand for the height and width.
[IMAGE: https://steemitimages.com/DQmUMBQ9vzFgkbc8hbNjGYhQfgZ7GTfjydnrfG31i4Kcx5B/image.png]
We can also resize to a cropped version of the photo and align it as we wish. It's very useful feature!
https://process.filestackapi.com/myFaKeApIKeY123/resize=w:100,h:500,fit:crop,align:faces/https://cdn.pixabay.com/photo/2018/01/04/14/16/woman-3060784_960_720.jpg
The align option takes also left, top, right, bottom or center and can be combined like this [top, right]
[IMAGE: https://steemitimages.com/DQmeXiB78PyjibzREJqV4Ui6CY4fqga3nawS4Ba1MKDTANz/image.png]
Cool, eh?
Borders
There are some border parameters:
- circle
- torn_edges
- shadow
- polaroid
- vignette
Let's see them in action:
https://process.filestackapi.com/MyFakeApiKey/polaroid/https://cdn.pixabay.com/photo/2018/01/04/14/16/woman-3060784_960_720.jpg
[IMAGE: https://steemitimages.com/DQmX3pLJs4BrzBfowovn3XhrdmH2RgmUQG8rxhxAZdiaHtr/image.png]
https://process.filestackapi.com/MyFakeApiKey/circle/shadow/https://cdn.pixabay.com/photo/2018/01/04/06/44/snow-3059974_960_720.jpg
https://steemitimages.com/DQmYimTdKyQh2EwL5LuuzFoWu41sf7PTfm9WPLn1KbHR2Rt/image.png
Filters
Some are available too:
- monochrome
- sepia
- sharpen
- blur
- oilpaint
- blackwhite
And some in live action:
https://process.filestackapi.com/MyFakeApiKey/sepia/https://cdn.pixabay.com/photo/2018/01/04/06/44/snow-3059974_960_720.jpg
[IMAGE: https://steemitimages.com/DQmZUaYVR1HunpGVKE1WUSSUqgAS5qyFL11V2FCspCx4fPL/image.png]
https://process.filestackapi.com/MyFakeApiKey/oil_paint/https://cdn.pixabay.com/photo/2018/01/04/06/44/snow-3059974_960_720.jpg
[IMAGE: https://steemitimages.com/DQmbcetLjH18VcghXviLzbpqUgBasbLw76X3fRcXcTvwSqG/image.png]
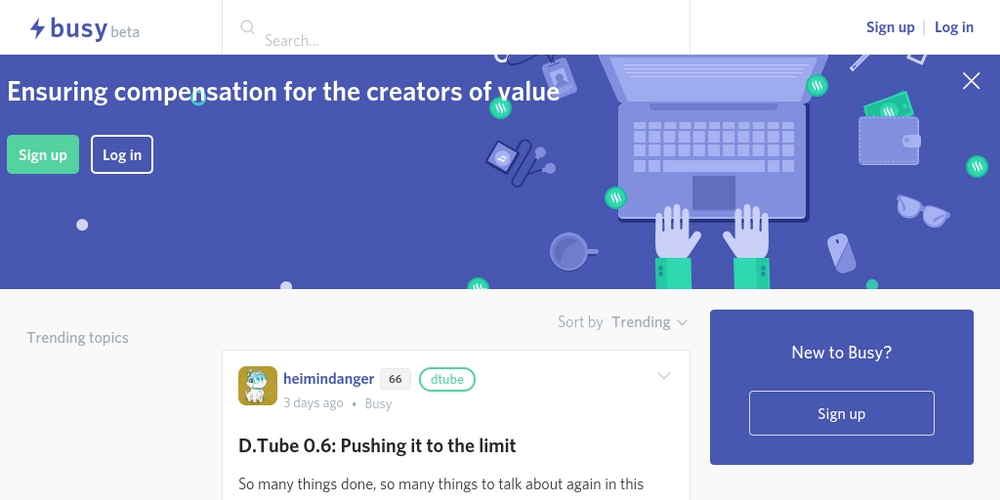
URL Screenshot
Are you lazy enough? No probs.
https://process.filestackapi.com/MyFakeApiKey/urlscreenshot/resize=h:500,w:1000,fit:crop,a:top/http://www.busy.org
[IMAGE: https://steemitimages.com/DQmThqEW7GcwTz8Tem3GKdMpKcepYmqBPx9CApBHcewMCzz/image.png]
Image to ASCII
Always wanted to generate some cyber?
https://process.filestackapi.com/MyFakeApiKey//ascii/https://s11.postimg.org/6fr8dafcj/steem.jpg
                                                        ..
                                                      .:;,
                                                    ,:;;;.
                                                  ,;;;;;;.
                                 .              .:;;;;;;:                        .
                              .:11.            ,;;;;;;;;:                     .;1i
                            .;1tfi            :;;;;;;;;;:                   .ittf:
                           :1fttt;           :;;;;;;;;;;;                 .;ttttt,
                         .ifttttt:          ,;;;;;;;;;;;;.               ,ttttttt.
                        ,tttttttf;          ,;;;;;;;;;;;;;              :tttttttt,
                       .1tttttttti          .;;;;;;;;;;;;;:            ,ttttttttf:
                       ,tttttttttt,          :;;;;;;;;;;;;;:           ;ttttttttt1.
                       .ttttttttttt.         .;;;;;;;;;;;;;;,          :tttttttttti
                        ;fttttttttt1.         :;;;;;;;;;;;;;;,          1tttttttttf;
                         1tttttttttt1.         :;;;;;;;;;;;;;;,         ,ttttttttttt;
                         ,ttttttttttt1         .;;;;;;;;;;;;;;;,         ;ttttttttttt;
                          :ttttttttttt1         .;;;;;;;;;;;;;;;,         ittttttttttt;
                           ;ftttttttttti         ,;;;;;;;;;;;;;;;,         1ttttttttttt:
                            ;ftttttttttti         ,;;;;;;;;;;;;;;;,        .1ttttttttttt:
                             iftttttttttti         ,;;;;;;;;;;;;;;;,        .1ttttttttttt:
                              ittttttttttf;         ,;;;;;;;;;;;;;;;.        .tttttttttttt,
                               iftttttttttf;         ,;;;;;;;;;;;;;;;.        .tttttttttttt,
                                iftttttttttt:         ,;;;;;;;;;;;;;;;.        .ttttttttttt1.
                                 ittttttttttt.         ,;;;;;;;;;;;;;;:         ,ttttttttttti
                                  1tttttttttt1          :;;;;;;;;;;;;;;:         ,ttttttttttf:
                                  .1tttttttttt:          :;;;;;;;;;;;;;;.         ,ttttttttttt.
                                   .tttttttttti           :;;;;;;;;;;;;;;          :tttttttttt:
                                    :ttttttttf;            :;;;;;;;;;;;;;,          1ttttttttt,
                                    .tttttttfi             .;;;;;;;;;;;;;:          :fttttttt:
                                    .ttttttt:               ,;;;;;;;;;;;;:          :fttttf1,
                                    :ftttti.                 ;;;;;;;;;;;:           ittttt;
                                    1ttt1:                   :;;;;;;;;;:           ,tttti.
                                   :ft1:                     ;;;;;;;;;,            1fti,
                                  .1i:                      .;;;;;;;:.            :t;,
                                   .                        :;;;;;;,              ..
                                                           .;;;;;,
                                                           :;;;,
                                                          .;:,
                                                           .
I hope you liked this tutorial! Follows and resteems are much appreciated! :)