[IMAGE: https://img.esteem.ws/97z3ggf77r.jpg]
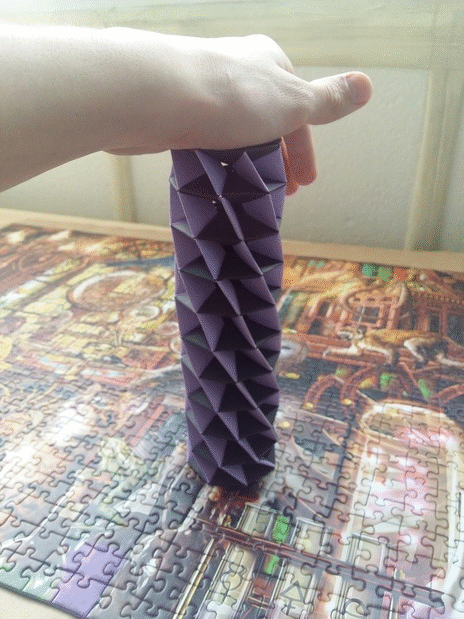
This is a fairly simple model to fold, assemble and is fun to play with. For materials I'd suggest something a bit thicker than printer paper, some thin color paper worked like a charm. I made the printer paper model first but it seemed to twist quite badly and didn't return to it's original shape.
This model is made of 2 different units which are almost identical, only difference is that the end pieces have less folds on one side. Here's how you fold them (I decided to use some of my home made tissue foil since it's easier to see steps with and I wanted to try it out):
You start with a 1:2 rectangle
[IMAGE: https://img.esteem.ws/4go167zpch.jpg]
Fold in half
[IMAGE: https://img.esteem.ws/0kb3y5s8nc.jpg]
Unfold and fold towards the middle from both sides
[IMAGE: https://img.esteem.ws/eojw2byro5.jpg]
Rotate 90*
[IMAGE: https://img.esteem.ws/11d3rxl0f4.jpg]
Fold a corner up
[IMAGE: https://img.esteem.ws/kdb3j875dq.jpg]
Fold towards the corner
[IMAGE: https://img.esteem.ws/tr35x2487r.jpg]
Rotate 180*
[IMAGE: https://img.esteem.ws/gm976aw8e2.jpg]
Fold along the diagonal
[IMAGE: https://img.esteem.ws/d5f8rf7pt3.jpg]
Unfold everything
[IMAGE: https://img.esteem.ws/o5nl4587u6.jpg]
Reassemble using existing creases(2 images to help)
[IMAGE: https://img.esteem.ws/y7z9mtlw93.jpg]
Repeat on the other side(under the corner flap, raise if necessary)
[IMAGE: https://img.esteem.ws/byp4cd8vdq.jpg]
[IMAGE: https://img.esteem.ws/vu7jxz9rwh.jpg]
Push the remaining corner under
[IMAGE: https://img.esteem.ws/88zrno8m0g.jpg]
[IMAGE: https://img.esteem.ws/ix4hs7c84m.jpg]
Fold in half
[IMAGE: https://img.esteem.ws/uqnx8ynlvx.jpg]
Rotate 90*
[IMAGE: https://img.esteem.ws/k47anqxs6a.jpg]
Fold along the layer in the back
[IMAGE: https://img.esteem.ws/lhgikkwowi.jpg]
Fold bottom flap up
[IMAGE: https://img.esteem.ws/nai7qu6on9.jpg]
This is where the middle and end piece begin to differ, for the middle piece you repeat the last 2 steps in the back and for the end piece you simply fold the little corner in
[IMAGE: https://img.esteem.ws/sfig4cvsl6.jpg]
This is the end piece with the corner up
[IMAGE: https://img.esteem.ws/am38p4w405.jpg]
And now the middle piece
[IMAGE: https://img.esteem.ws/qgfeku27iw.jpg]
[IMAGE: https://img.esteem.ws/h7cj3y5nop.jpg]
Here's how they compare
[IMAGE: https://img.esteem.ws/df117ttlmw.jpg]
The assembly is not that hard, to start you join 8 end pieces to form a ring. after that you just keep adding middle pieces till you're satisfied with the height. You'll need 8 pieces for the horizontal inner part and 8 for vertical, in short there are a lot of pieces but you can make it as big or small as you want.
In case someone is lost with some steps here is a video tutorial for the model where I learned it and decided to make it as tall as I could but gave up at a bit over 100 pieces. I wanted to add the assembly photos but it's much easier to explain with video but my previous origami-video setup was a nightmare.
And finally here's a gif of the tower in action
.gif)
Hope you enjoyed my post, have a nice day :)